
spring 설치 후 완전 완전 기본 세팅인 것만! (db 연결 관련은 다음 글에 따로 정리)
Build Path / pom.xml / web.xml 세팅
Build Path 설정

1. JRE System Library 버전 수정(자바 버전과 일치하게)
처음에 들어가면 기존 JRE System Library 버전이 jdk-11로 되어있지 않음.
Remove 후 Add Library > jdk11로 변경
2. 사용할 Libraries 추가
Add External JARS > ojdbc8.jar / jstl.jar / standard.jar 직접 추가
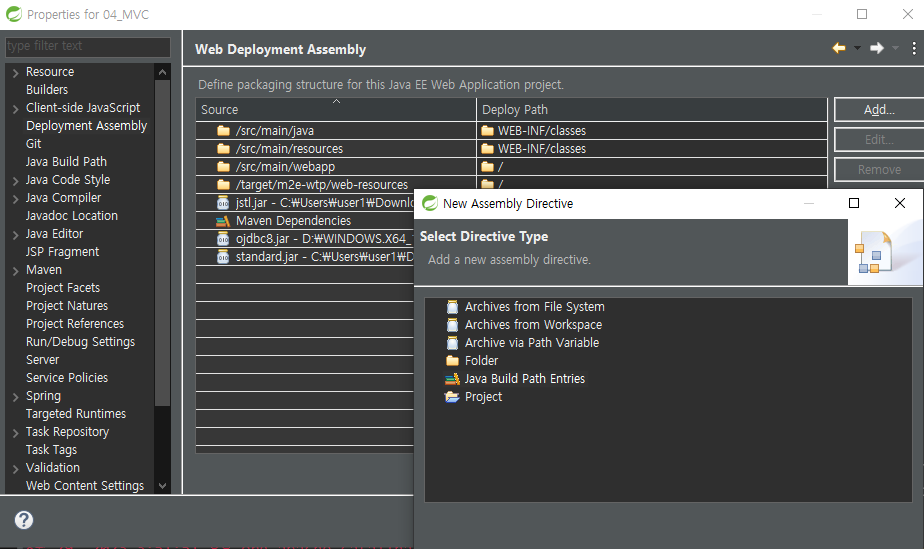
3. Deployment Assembly
add > Java Build Path Entries > ojdbc, jstl, standard 모두 추가
pom.xml
버전 수정 및 dependency 추가할 때 https://mvnrepository.com/ 사이트에서 많이 사용하는 것 참고하면 좋음
1. java, spring 버전 수정
<properties>
	<java-version>11</java-version>
	<org.springframework-version>5.2.9.RELEASE</org.springframework-version>
	<org.aspectj-version>1.6.10</org.aspectj-version>
	<org.slf4j-version>1.6.6</org.slf4j-version>
</properties>
springframework-version의 경우
https://mvnrepository.com/ 사이트에서 가장 많이 사용 중인 RELESE 버전으로 적용
2. <dependency> 추가
- spring-jdbc(버전 springframework와 일치하도록 수정해서 추가)
<!-- https://mvnrepository.com/artifact/org.springframework/spring-jdbc -->
<dependency>
	<groupId>org.springframework</groupId>
	<artifactId>spring-jdbc</artifactId>
	<version>${org.springframework-version}</version>
</dependency>
- mybatis, mybatis spring, commons-dbcp 추가 (db 관련)
<!-- https://mvnrepository.com/artifact/org.mybatis/mybatis -->
<dependency>
	<groupId>org.mybatis</groupId>
	<artifactId>mybatis</artifactId>
	<version>3.5.6</version>
</dependency>

<!-- https://mvnrepository.com/artifact/org.mybatis/mybatis-spring -->
<dependency>
	<groupId>org.mybatis</groupId>
	<artifactId>mybatis-spring</artifactId>
	<version>2.0.6</version>
</dependency>

<!-- https://mvnrepository.com/artifact/commons-dbcp/commons-dbcp -->
<dependency>
	<groupId>commons-dbcp</groupId>
	<artifactId>commons-dbcp</artifactId>
	<version>1.4</version>
</dependency>
- lombok 추가
<!-- https://mvnrepository.com/artifact/org.projectlombok/lombok -->
<dependency>
	<groupId>org.projectlombok</groupId>
	<artifactId>lombok</artifactId>
	<version>1.18.28</version>
	<scope>provided</scope>
</dependency>
- plugin 수정
source, target을 java 버전과 일치하게 수정
<plugin>
     <groupId>org.apache.maven.plugins</groupId>
     <artifactId>maven-compiler-plugin</artifactId>
     <version>2.5.1</version>
     <configuration>
          <source>11</source>
          <target>11</target>
          <compilerArgument>-Xlint:all</compilerArgument>
          <showWarnings>true</showWarnings>
          <showDeprecation>true</showDeprecation>
     </configuration>
</plugin>
web.xml
시작페이지를 index.jsp로 설정해버리고 싶다면?
src > main > webapp > index.jsp 파일을 추가 후 web.xml에서 웰컴파일로 등록해 주면 됨!
보통 jsp 파일은 위 경로 따라 만들거나 폴더를 하나 더 빼서 만들면 된다
나중에 jsp 파일도 다 없어지거나 바뀐다는데 일단은 차근차근 따라가보자
<welcome-file-list>
		<welcome-file>index.jsp</welcome-file>
</welcome-file-list>
한글처리 하고 싶으면 한글 관련 인코딩 필터를 추가해야겠지?
spring 자체에서 필터 관련 클래스를 가지고 있다고 한다.
web.xml에서 경로 추가해 주면 됨!
<filter>
	<filter-name>encodingFilter</filter-name>
	<filter-class>org.springframework.web.filter.CharacterEncodingFilter</filter-class>
	<init-param>
		<param-name>encoding</param-name>
		<param-value>UTF-8</param-value>
	</init-param>
</filter>
<filter-mapping>
	<filter-name>encodingFilter</filter-name>
	<url-pattern>/*</url-pattern>
</filter-mapping>
'+ > Spring' 카테고리의 다른 글
| STS4에서 STS3 플러그인 설치 오류 (Spring Legacy Project 생성) (2) | 2024.05.16 |
|---|---|
| Spring Lombok @Data @Getter @Setter 인식 인식 오류 해결 (1) | 2024.05.13 |
| [springboot] 명령 프롬프트(cmd) 이용하여 빌드하고 실행하기(윈도우) (0) | 2023.09.26 |
| [springboot] welcome page 만들기 (0) | 2023.09.23 |
| Spring - 기본 세팅하기(2) (0) | 2023.09.16 |